First proper attempt at creating art/sculpture through book folding! Quite pleased with the result. I just did a very basic one, folding the top and bottom edges back to align with the spine, creating a point. I left a few pages free and simply tucked the pages round. Will be more adventurous next time.
After making a puff pastry topped pie Saturday night, I found myself in a rare situation: I had some leftover pastry. I’d bought a sheet of ready rolled puff pastry and so had a nice even rectangle- quite a substantial piece. What to do with it?
As we have autumn raspberries in the garden, currently ripe for the picking, it made sense to do something with those. My good friend Google came up with lots of recipe suggestions, so I took the bits I wanted and created some delicious raspberry filled parcels.
If you fancy making them, here’s what you’ll need:
Ready rolled puff pastry
Fresh raspberries (roughly a handful will make 2)
Cream cheese
Icing sugar
Preheat the oven to about 175 C.
First, I divided the pastry in two even(ish) rectangles. If you’re using a whole sheet of puff pastry, you’ll probably get 4-6 parcels out of it, depending how big you want to make them. Cover a baking tray with baking paper and but the pastry rectangles on there.
You’ll need a good dollop of cream cheese to go in each of these- mix this in a bowl with a table spoon of icing sugar. Taste, and add more if you want it sweeter. Once I was happy, I spread the cream cheese mixture onto the bottom half of each rectangle.
On top of this, I put my fresh raspberries. Mine were straight from the garden- it was raining and some were really very ripe, so they do look a bit soft!
Next, I folded the tops over. I’d read a lot of recipes that said to use and egg wash round the edges, to help stick them together. But Martha Stewart’s recipe for turnovers just calls for water, and if that’s good enough for Martha it’s good enough for me! So, a bit of water round the edges, fold them carefully and press together firmly. I was a bit fancy and went round the edge with a fork. I let these rest in the fridge for a bit, and sprinkled icing sugar over the top before popping them in the oven.
These took about 35 mins. Keep an eye on them though- when they’re nicely puffed up and golden on top, they’re ready! The insides will be very hot for a while. I counteracted this by serving with a nice shot of ice cold limoncello, straight from the freezer. This was a perfect match!
Raspberry puff pastry parcels, limoncello on the side- a perfect Sunday evening treat!
I saw this wonderful piñata cake on domestic sluttery a little while back. As the husband is a sweet fanatic, I just had to try and make it!
I went for half the quantities they did, as, actually, there weren’t going to be that many cake eaters – this was mainly to see my husbands face light up when he cut open the cake and saw all the sweeties. This seemed like a great plan at the time.
Basic sponge cake recipe:
6 oz caster sugar
6 oz unsalted butter (room temperature)
3 eggs (beaten, room temperature)
6 oz self raising flour
Line two 20cm tins and preheat the oven to 180ºC
Cream together the butter and sugar until light and fluffy. And the eggs a little at a time, beating well after each addition. Fold in the flour. If the mixture is a little thick, add a small amount of milk until it reaches a dropping consistency.
Bake in the preheated oven for 25-30 mins.
Ta da!
Oh. Hm. My cakes never did rise very well!
The idea was to hollow out a bit of each cake and fill with sweets. But if, like me, your cake didn’t turn out quite right, there is a solution:
Cut up the cake and use jam and butter icing or frosting to build cake walls in which to put the sweets:
Then use the rest of the butter icing or frosting to cover up anything that needs covering up:
I made cake balls from the left over bits of cake, coated them in chocolate, and used them to try and make it look a bit more exciting on the outside:
Piñata time!
I just googled, looked at various tutorials, then played around with an old magazine – the chunkiest I could find!
Found the middle then worked my way out, alternating the types of folds evenly.
Coptic binding is something I’ve been wanting to try for ages and I found a really great tutorial. I love this one particularly as the pictures are so clear.
To practise this technique, I decided to bind my old sketches together. They’ve been laying around, sheets of A4 from sketch pads that have fallen to bits… I don’t really know why I keep them but I do! Binding them all together meant I could keep them all tidy in one place and also have a go at coptic binding. Winner.
I love the spine!
One of the advantages of this type of binding is that allows the pages to lay nice and flat:
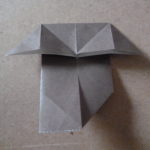
One of my favourite Christmas presents this year was this book: Everything Oz, The Wizard Book Of Makes & Bakes. Ever eager to have a reason to try out new craft projects (though sometimes no reason is needed!) I chose the paper balloon mobile to make as a gift for my friend, who’s just had a baby boy. Armed with some adorable but subtle blue pram-printed paper from good old Paperchase, I set to work.
I’ve decided that I’m not going to post a full tutorial on here, because I really think that if you like crafts then you’ll love this book- it’s a great investment. However, I’ve done little pictures of my progress, so you can get a good idea of how these are made.
So. Here goes. Basket first:
The base is a circle with tabs round the outside, which are attached to a long rectangular strip of paper (nice surface on the outside!).
Next, I made the swags to go around the edge of the basket:
I did 4 of these, evenly spaced. Ish.
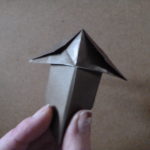
Then on to the balloon! Using a variety of papers works well. I used blue printed, sometimes inside out, plus some plain silver.
I adapted the balloon bit slightly, using the method from the paper beads I make.
All that was left to do then was to attach the basket to the balloon:
Ta da! I’ve added a few embellishments, a silver paper bow to cover up a gap in the swags, where the string was glued on and also some teeny triangles for bunting:
A hot, sticky September afternoon is perhaps not the best time to try making these, but I’d got it into my head that I wanted to try. So I did. I know these aren’t proper Florentines, but I couldn’t think what else to call them!
I started by tracing some circles on a sheet of baking paper. I used what I thought was a suitably sized cookie cutter:
This went onto a baking tray. I melted some chocolate and used my teeny ladle to scoop it inside the circles. If you’re careful, you should be able to dollop in a nice circle- let it stop about half a centimeter from the edge of the circle. Doing it this way meant there was room for the mixture to spread a little when I gently ‘dropped’ the tray a few times onto the work surface, to get rid of the air bubbles.
I was worried about putting too much on, but I think I got it about right! They were thin, but still substantial enough to be satisfying to bite into.
After they’d set a little but the chocolate was still nice and soft, I sprinkled on a nice mix of dried fruit and seeds. I found a little bag in Asda that had a good mix of tiny seeds, bigger seeds and different coloured dried fruits:
I left these to set in the fridge; I’d let to say it was until they were nice and firm, but I’m afraid we just couldn’t resist and tried them while they were still a little melty!
“What shall I call those things I just made?” I asked my husband. “Oreo Wonderfuls” said he. Ok then. Since I can’t think of anything to call them, Oreo Wonderfuls it is.
I started thinking about making these after watching Lorraine Pascale make her cheaty cake pops, where she combined Oreos and chocolate spread. After a quick browse on the internet, I found lots of similar “recipes” that used cream cheese instead of the chocolate spread. This seemed like a far better idea, as we use the light version cream cheese in our house and can thus pretend that these aren’t actually that bad for you.
Basically, all you need is:
Oreo cookies
Cream cheese
Chocolate
And you’re good to go. You’ll need roughly twice the weight of Oreos as you do cream cheese. I used 8 oz Oreos and 4 oz cream cheese, which made 20 bite sized balls.
Ready? Go:
Put your Oreos in a food processor, blender, or bag if you don’t have either of those. It helps if you take the cookies apart first. Pulse (or bash with a rolling-pin, if you have them in a bag!) until you have fine crumbs.
And the cream cheese and blend together until you have a nice even gooey lump of deliciousness.
Put a sheet of baking paper on a baking tray or similar. Roll the mixture into little balls the size of your choosing and place them on the tray, then pop this in the freezer for a while to firm up.
While they’re in there, you can start melting your chocolate- I find it easiest to do in the microwave, but a double-boiler works too of course. You need to get it as runny as you can, but keep heating in small amounts and stirring, so you don’t over heat the chocolate.
Once it’s ready, you can start dipping! I just used a spoon and dropped the cookie ball into the chocolate, rolled it a bit then took it out- they’ll need to go back on the baking paper covered tray, by the way, so keep it handy.
When they’re all coated, you’ll need to stick them in the fridge for a while to set. If you’re feeling fancy, once they’ve been dipped you can cover them in nuts/sprinkles etc. to make them look even more exciting. Personally, I quite like the rough-coating look, so I left mine be:
These are so easy and so delicious, I think I’ll be making them quite a lot.
This cake is not as faffy as it seems and it is de-licious.
Ingredients:
175g butter
100g castor sugar
100g clear honey
100g walnuts
3 large eggs
225g self raising flour
The recipe calls for a 20cm square shallow tin, but I used a round one!
Firstly, preheat your oven to 180ºC. While it’s heating up, line your tin with baking paper and measure out your ingredients.
Next, toast walnuts in the oven for 5-6 mins; cool a bit, then roughly chop and set to one side.
Meanwhile, melt the butter in a pan over a low-ish heat. And the sugar and honey and stir until dissolved. Once it’s nice and smooth, bring it to the boil, then pour into a large mixing bowl and allow to cool to about room temperature.
Meanwhile, beat the eggs lightly. Add to the cooled honey mixture and whisk until evenly blended.
Finally, gently mix in the flour and chopped walnuts. You should now have something that resembles a cake mix! Pour it into the tin, level out, then bake in the oven for 30-40 mins. I was using a fan oven and it was pretty much done after about 25 mins; just keep an eye on it, once it’s a lovely deep golden brown and springy on top, it’s ready!
Allow to cool on a wire rack, then slice it up and eat it- makes a great accompaniment to coffee or Bailey’s. Or indeed coffee and Bailey’s.