Categories
Craft Inspiration Origami Tutorial Weddings

The Wedding Season – DIY finds and alternative ideas

Wedding sweet table

I love a handmade wedding, I really do –  and I know I’m not alone! So many people are now realising that they can contribute to their own weddings to make them unique and personal. The great thing is you can do as much or as little as you can; it’s still just as satisfying.

I’ve created a Pinterest board (how I wish it was around when I was planning my wedding!) full of wedding inspiration, ideas, tutorials, and, let’s be honest, stuff I just love the look of. I’ve also included some of my wedding items which you can find in my Etsy store, along with other great handmade items you can buy.

Here are a few of my faves from the board so far:

  • Wildflower confetti – make cones out of a sheet of paper and fill with pretty petals.

Petal confetti

  • Looking for musical inspiration? This book contains some great song suggestions, plus a few hints and tips on the big day. Includes a foreword from Rock ‘n’ Roll Bride’s very own Kat!

Wedding music book

  • Try your hand at making these gorgeous wedding favour lollies – get the tutorial here.

DIY wedding lollies


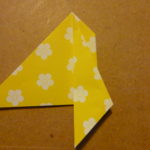
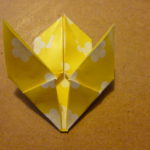
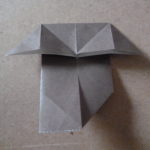
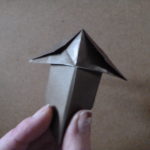
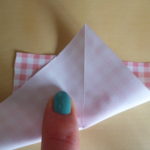
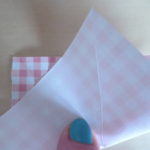
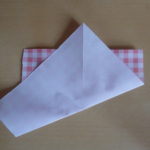
If you’re looking for something simple to make with inexpensive materials, I’ve got a tutorial here for you – origami heart cards. They’re very quick to fold once you get the hang of them, and can be used in various way. Hover over the pics in the gallery below for step-by-step instructions:


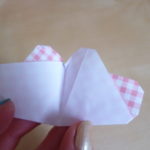
These would make nice simple (and cheap to post!) save the date memos:

P1040401

You could use these to decorate the tops of your favour boxes (simply glue together if you don’t want to use as a card):

Favour box decorationOr, use them for a place setting – or a place setting/box topper combined. You could even write a personal message on the inside:

Place setting


The nice thing about these is you don’t need to get special origami paper – you can even cut down bog standard printer paper into squares. This is great for getting the exact size you want – just experiment!


Enjoy x


Categories
Craft Inspiration Tutorial

All Things Spring! Crafts and Inspirations

Spring is one of my favourite times of year. There’s so much newness going on it’s hard not to get inspired! From colour palettes to tutorials, I’ve started scouring the web to find the best ideas of the season. Here are a few of my favourites:

  • Painted twigs

Spring twigs

So pretty – and such a simple idea!

  • Edible flower lollies

Lollies

Adding edible flowers (e.g. rose petals, lavender) to your homemade lolly molds looks gorgeous. Hopefully it will be warm enough for ice lollies this spring…

  • Pom pom bunny

Pom pom bunnies

Because pom poms. And because bunnies. Tutorial found here.

  • Spring weekly planner

Spring planner

Oh planning, I love planning. This pink spring set is available from WendyPrints over on etsy. Time to get those to do lists looking fabulous!

  • Plant shelves

Spring ladder

This idea of using an old ladder as shelves for your potted plants looks stunning. A great way of adding some spring colour to even the smallest garden.

You can follow my spring Pinterest board here for more ideas.

Categories
Craft Origami Paper Tutorial

Paper Flower Workshop: test run

Origami workshop creations


Over the Festive season, tucked in between Christmas and New Year, I ran my very first workshop. It was just a small group at a friend’s house and I knew everyone there, so I figured it would be a good way to test things out. Check out my team of paper folders 🙂 :

Happy workers!
Happy workers!

The main project I wanted to try out was the origami kusudama flower: a modular item made up of five petal units. These are the same flowers I used to make the wedding flowers I did recently. The folds are fairly straightforward, but not so simple that there’s no challenge, and the end result is very satisfying!

Step 1: I made sure I brought along everything we’d need. This is one step I got right first time – squares of practice paper, squares of pretty paper, glue, glue pot and enough sticks/brushes for everyone, paperclips, sparkly beads on wire, pearls, sticky gems… ok so I forgot a table cloth and had to borrow an old sheet, but I still think I did a pretty good job.

Flowers in the making

It being my first time, I had trouble trying to gauge who needed help, who wanted help, and who wanted to be left alone to figure it out for themselves. Everyone is different and works differently but we all got there in the end- apart from my husband, who gave up after one petal, but I’m ignoring that.

Someone's done this before...
Someone’s done this before…

Overall the workshop took about an hour, which I think is a good amount of time. We were all there for the evening though, so carried on and did some teeny cranes and butterflies!

Ta da!
Ta da!

The experience was really good fun and I would love to do some proper workshops in the future. There are definitely things to improve on though, and I’ve come up with some useful hints and tips for anyone thinking of running their own workshop:

  1. Make sure you have EVERYTHING with you. I know you say you think you have. But maybe just double check?
  2. Have an example of whatever you’re making to show people – on a large scale if possible.
  3. Explain the fundamentals of the craft you’re about to demonstrate; the basic techniques, maybe a bit of history, uses in today’s society.
  4. Write out step-by-step instructions FOR YOURSELF. Really, do it. I’ve made well over 500 flower petals but when it came to showing other people, I had a block on the basic steps. I just couldn’t think if I was doing it right. So write yourself a how to!
  5.   Before doing the workshop, talk through the steps you’ll be showing to someone you know well. Someone who will butt in and tell you if what you’re saying doesn’t make sense. Somethings are easy to do but not explain. “Just fold this bit here… no this bit… yeah… fold it to that other bit over there…”
  6. Talk clearly, explain fully, demonstrate as neatly as possible and keep looking round at everyone to make sure they’re all up to speed. As I mentioned before, it is hard to gauge how much help people want and need, but I think this will come with time.
  7. Time your workshop!

I think that just about covers everything 🙂 Till next time x

Close up origami

Categories
Craft Paper Tutorial

Paper feathers


So far, so good; this is the first of my Pinterest Picks that I’ve actually attempted to make for once!
I’d seen a few tutorials for paper feathers, it looked pretty easy so I just got my stuff together and tried it out. Here we go!

Firstly, I cut some feather shapes – two for each feather – from some old sheet music:

Paper feathers 1

Next, I tightly rolled some paper, for the end of the feather:

Paper feathers 2

Then I made sets of the feather components. Paper shapes, a thin bit of wire to go up the middle (this really helps with shaping the feathers!) and a snip of the rolled paper:

Paper feathers 3

I covered the back of one of the feather shapes with glue, positioned the wire and end, then placed the second shape over the top:

Paper feathers 4

At this point I smoothed it as much as possible and left it all to dry. The last thing to do is snip along the edges to create the feather effect. I found the more of a downward angle I cut at, the better the effect; also, snip as close together as you can. These are my finished attempts:

Paper feathers 5


Categories
Craft Inspiration Paper Tutorial

Pinterest Picks

Everyone knows Pinterest is a great place to find craftspiration (sure, it’s a word… just go with it…) and I often find myself pinning project after tutorial after project on my craft board and not doing a single one. I’ve decided to try and narrow my picks down to a few a month, and take the time to actually try them out – and then post my findings! So, here are my first lot of Pinterest Picks:

  • Paper Feathers. They look so delicate and would make great displays or table decorations:

Paper feathers

  • Pom pom bouquet. I bought a pom pom maker just before Christmas and *might* have got a little carried away. Making these pom pom flowers will be a great way to make use of any extras I may have:

Pom pom bouquet

  • Nail varnish flowers. This looks like it would be so simple to do but I’m wondering if it will work that well in real life. We shall see!

Nail varnish flowers


Categories
Art Books Craft Origami Paper Tutorial

Creative book folding

First proper attempt at creating art/sculpture through book folding! Quite pleased with the result. I just did a very basic one, folding the top and bottom edges back to align with the spine, creating a point. I left a few pages free and simply tucked the pages round. Will be more adventurous next time.

Book folding

Categories
Tutorial

Weekend baking – raspberry puff pastry parcels

After making a puff pastry topped pie Saturday night, I found myself in a rare situation: I had some leftover pastry. I’d bought a sheet of ready rolled puff pastry and so had a nice even rectangle- quite a substantial piece. What to do with it?

As we have autumn raspberries in the garden, currently ripe for the picking, it made sense to do something with those. My good friend Google came up with lots of recipe suggestions, so I took the bits I wanted and created some delicious raspberry filled parcels.

Raspberry parcel

If you fancy making them, here’s what you’ll need:
Ready rolled puff pastry
Fresh raspberries (roughly a handful will make 2)
Cream cheese
Icing sugar

Preheat the oven to about 175 C.

First, I divided the pastry in two even(ish) rectangles. If you’re using a whole sheet of puff pastry, you’ll probably get 4-6 parcels out of it, depending how big you want to make them. Cover a baking tray with baking paper and but the pastry rectangles on there.
You’ll need a good dollop of cream cheese to go in each of these- mix this in a bowl with a table spoon of icing sugar. Taste, and add more if you want it sweeter. Once I was happy, I spread the cream cheese mixture onto the bottom half of each rectangle.

Pastry squares

On top of this, I put my fresh raspberries. Mine were straight from the garden- it was raining and some were really very ripe, so they do look a bit soft!

Raspberries

Next, I folded the tops over. I’d read a lot of recipes that said to use and egg wash round the edges, to help stick them together. But Martha Stewart’s recipe for turnovers just calls for water, and if that’s good enough for Martha it’s good enough for me! So, a bit of water round the edges, fold them carefully and press together firmly. I was a bit fancy and went round the edge with a fork. I let these rest in the fridge for a bit, and sprinkled icing sugar over the top before popping them in the oven.

Pre oven  parcels

These took about 35 mins. Keep an eye on them though- when they’re nicely puffed up and golden on top, they’re ready! The insides will be very hot for a while. I counteracted this by serving with a nice shot of ice cold limoncello, straight from the freezer. This was a perfect match!

Raspberry parcel

Raspberry puff pastry parcels, limoncello on the side- a perfect Sunday evening treat!

Categories
Tutorial

Weekend baking – birthday piñata cake!

I saw this wonderful piñata cake on domestic sluttery a little while back. As the husband is a sweet fanatic, I just had to try and make it!

I went for half the quantities they did, as, actually, there weren’t going to be that many cake eaters – this was mainly to see my husbands face light up when he cut open the cake and saw all the sweeties. This seemed like a great plan at the time.

Basic sponge cake recipe:
6 oz caster sugar
6 oz unsalted butter (room temperature)
3 eggs (beaten, room temperature)
6 oz self raising flour

Line two 20cm tins and preheat the oven to 180ºC
Cream together the butter and sugar until light and fluffy. And the eggs a little at a time, beating well after each addition. Fold in the flour. If the mixture is a little thick, add a small amount of milk until it reaches a dropping consistency.
Bake in the preheated oven for 25-30 mins.

Ta da!

Oh. Hm. My cakes never did rise very well!
The idea was to hollow out a bit of each cake and fill with sweets. But if, like me, your cake didn’t turn out quite right, there is a solution:

Cut up the cake and use jam and butter icing or frosting to build cake walls in which to put the sweets:


Then use the rest of the butter icing or frosting to cover up anything that needs covering up:

I made cake balls from the left over bits of cake, coated them in chocolate, and used them to try and make it look a bit more exciting on the outside:

Piñata time!

Categories
Art Craft Paper Tutorial

Book art sculpture – first attempt

I just googled, looked at various tutorials, then played around with an old magazine – the chunkiest I could find!
Found the middle then worked my way out, alternating the types of folds evenly.

Categories
Craft Origami Paper Tutorial

Simple Origami Sunday: BUNNIES!

Two origami bunny tutorials:

The yellow one is inflatable, so when you get to the second to last step, you need to… blow into the bunny’s nose!