Simple to make and tasty. Kind of like making truffles; coat the moulds, make the filling (in this case, coffee mixed with sugar and heated, then poured over chopped choc and mixed till smooth) then pour into the set cases. When the filling is set and the top coat put on, smoosh a walnut half on.
So I made up a new blank notebook. Ivory paper:
Red and gold headband:
Simple black cover:
The intention was to stick a decorative metal key on the front, but I can’t quite decide how to place it. Which looks best?
I am both glad and sad that Shepherds Falkiners has moved. Sad because I can no longer browse their lovely store in my lunch hour, or wander down to buy more book binding supplies. Glad because it stops me buying yet more paper.
I am resigned to online window shopping and trying to think up an excuse to buy some of the following:
Oh. But I actually think I do need some of this French waxed paper for covering my notebooks:
Coptic binding is something I’ve been wanting to try for ages and I found a really great tutorial. I love this one particularly as the pictures are so clear.
To practise this technique, I decided to bind my old sketches together. They’ve been laying around, sheets of A4 from sketch pads that have fallen to bits… I don’t really know why I keep them but I do! Binding them all together meant I could keep them all tidy in one place and also have a go at coptic binding. Winner.
I love the spine!
One of the advantages of this type of binding is that allows the pages to lay nice and flat:
One of my favourite Christmas presents this year was this book: Everything Oz, The Wizard Book Of Makes & Bakes. Ever eager to have a reason to try out new craft projects (though sometimes no reason is needed!) I chose the paper balloon mobile to make as a gift for my friend, who’s just had a baby boy. Armed with some adorable but subtle blue pram-printed paper from good old Paperchase, I set to work.
I’ve decided that I’m not going to post a full tutorial on here, because I really think that if you like crafts then you’ll love this book- it’s a great investment. However, I’ve done little pictures of my progress, so you can get a good idea of how these are made.
So. Here goes. Basket first:
The base is a circle with tabs round the outside, which are attached to a long rectangular strip of paper (nice surface on the outside!).
Next, I made the swags to go around the edge of the basket:
I did 4 of these, evenly spaced. Ish.
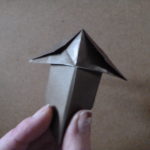
Then on to the balloon! Using a variety of papers works well. I used blue printed, sometimes inside out, plus some plain silver.
I adapted the balloon bit slightly, using the method from the paper beads I make.
All that was left to do then was to attach the basket to the balloon:
Ta da! I’ve added a few embellishments, a silver paper bow to cover up a gap in the swags, where the string was glued on and also some teeny triangles for bunting:
First visit to the charity shop this year and I visually stumbled upon ‘The Book Of Madness And Cures’ by Regina O’Melveny:
The title is as intriguing as the cover, and a quick scan of the blurb on the back cover (in short – a female doctor in Renaissance Venice is compelled to cross Europe in search of her father) confirmed my gut feeling- that I should buy the book immediately!