Categories
Origami Paper Tutorial

Easy Origami Rabbit Tutorial – Step By Step

I chose this for my next tutorial as 2023 is the Chinese year of the rabbit! There are lots of origami bunny tutorials; this is one of the simpler ones.

All you really need is some thin squares of paper and a pair of scissors.

If you make this out of double sided paper, the inside of the ears will be a different colour! Not got any? Use two thin sheets of different colours (that’s what I’ve done here).

Don’t forget to fold neatly and crease firmly – you can press the creases with the back of your thumb nail if you don’t have a creasing tool.

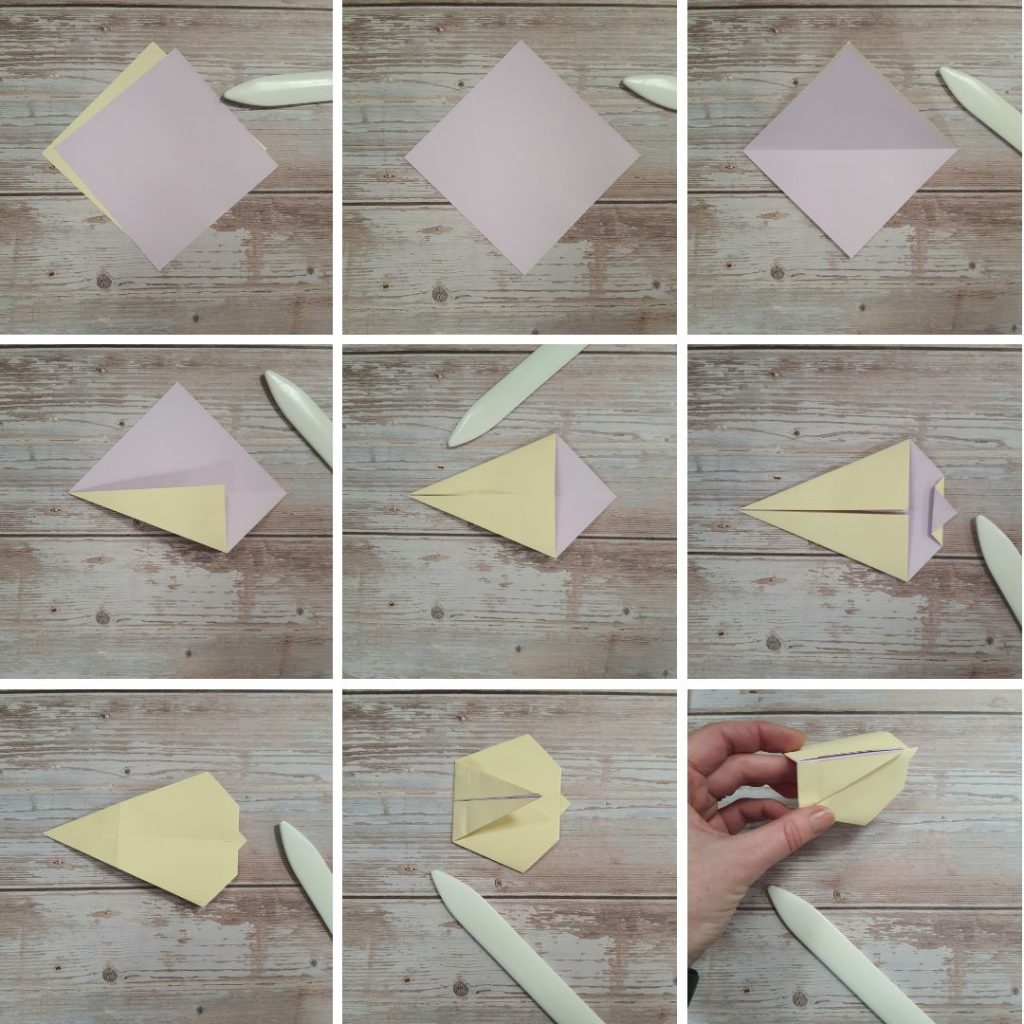
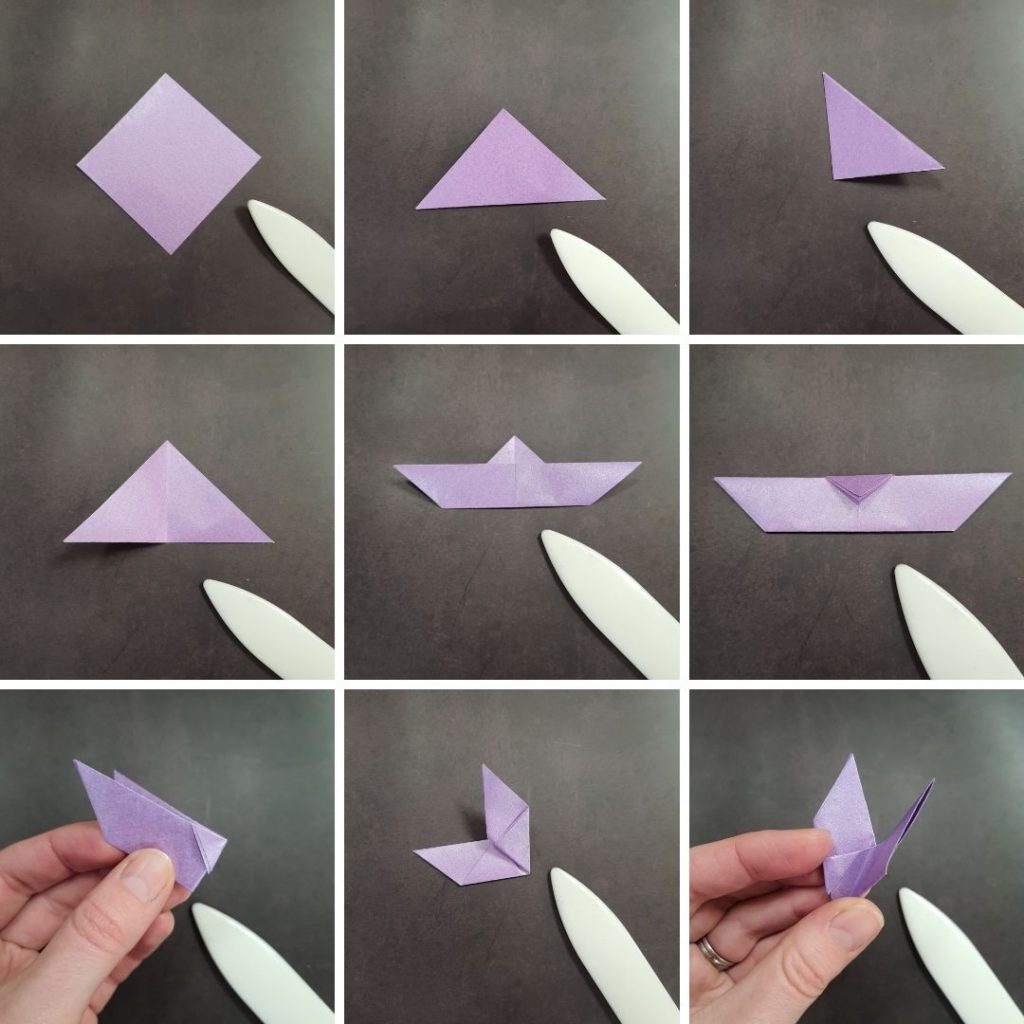
  • If you’re using two-colour paper, start with the colour you want the inside of the ears to be facing upwards.
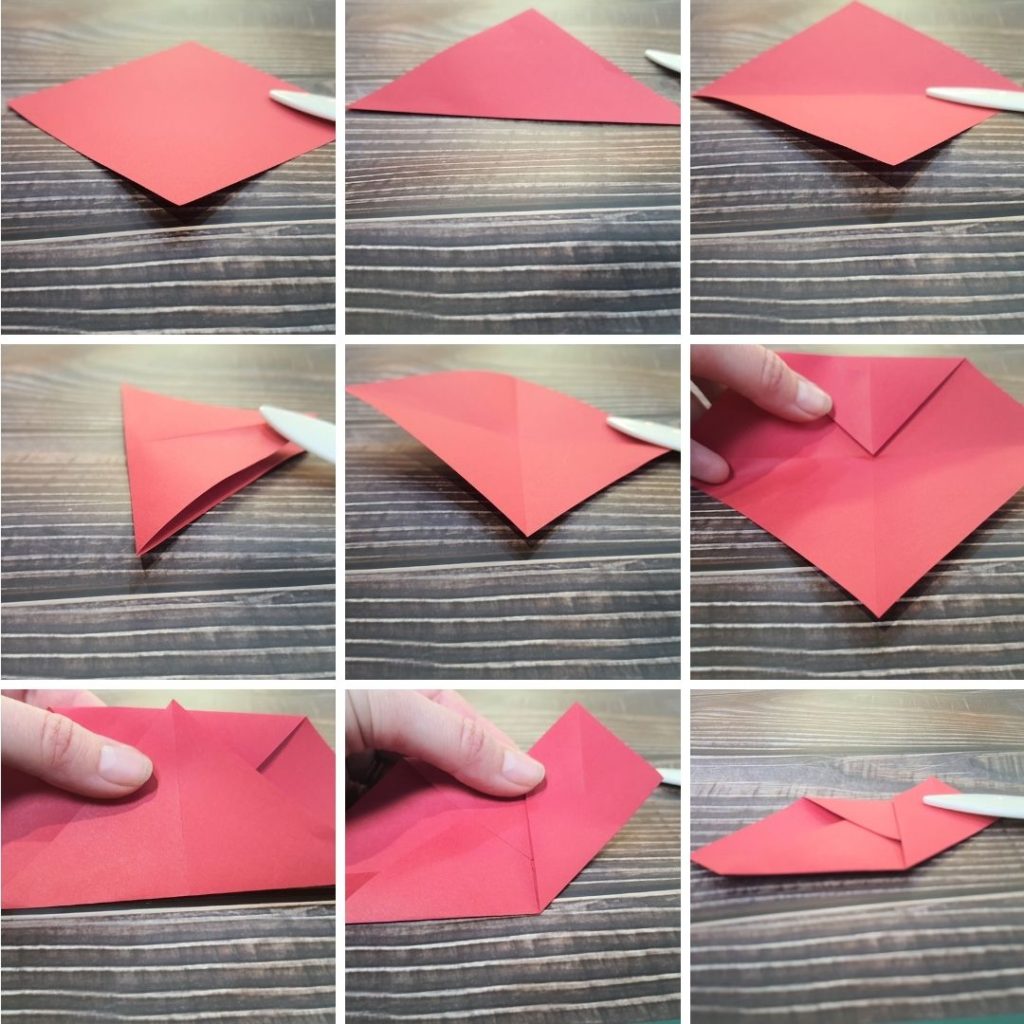
  • Start with the paper in a diamond shape, with a corner pointing towards you.
  • Fold in half from top point to bottom, crease and unfold.
  • Take the bottom left sloping edge and fold in to meet the centre crease.
  • Do the same with the top left edge.
  • Take the right hand point – fold it back to meet the edge you’ve just made, then fold the tip back the other way so it sticks out over the flat edge a bit (this will be the tail!)
  • Flip the whole thing over.
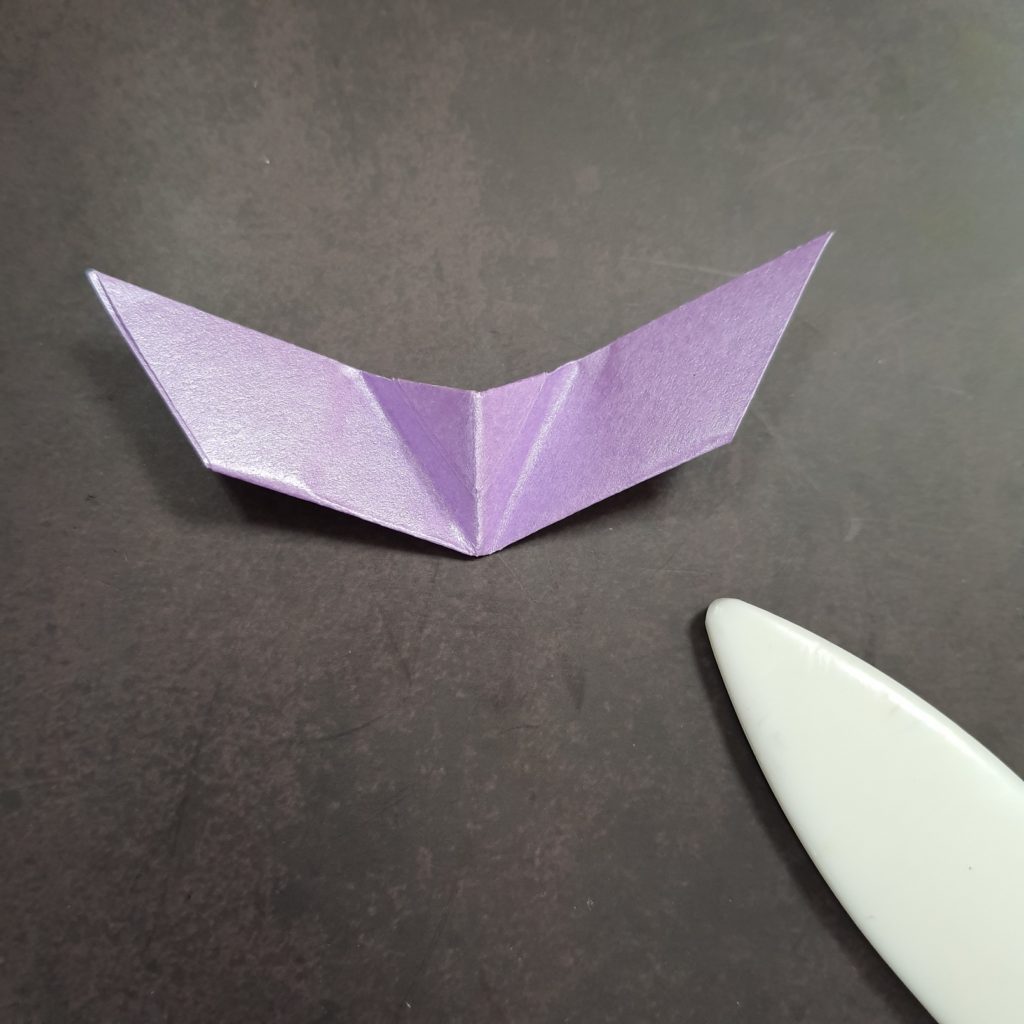
  • Fold the left hand point over to the right, so it almost meets the flat edge.
  • Next, fold the whole thing in half, bringing the centre crease upwards and the edges down towards each other – it’s easier if you pick it up to do this (see last picture).
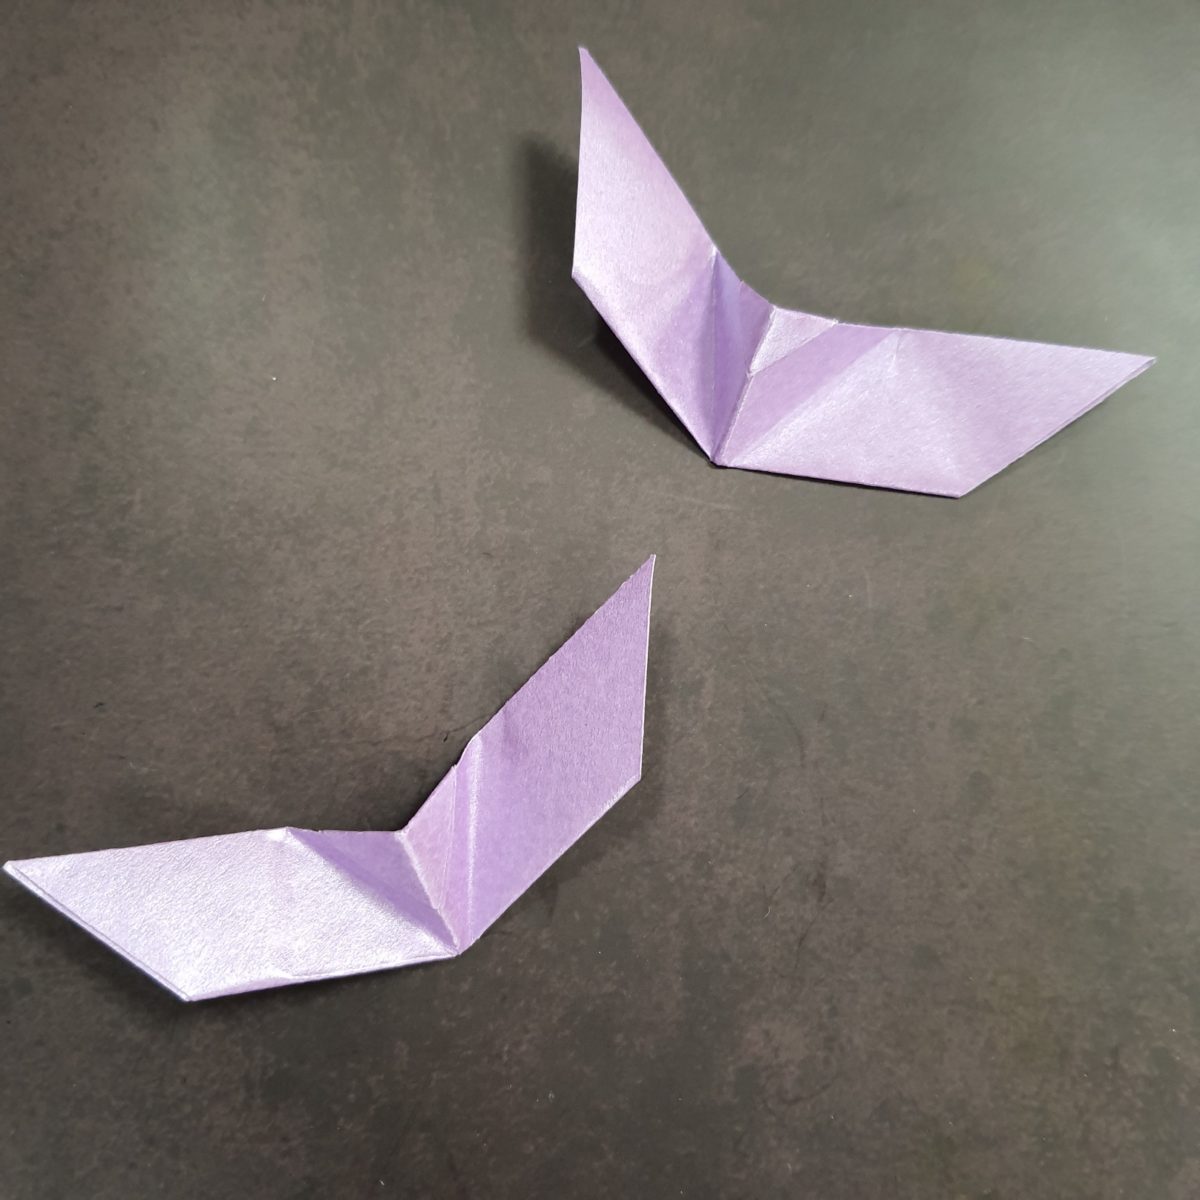
  • Now we’re going to make the ears! At the moment, they look like they’re laying along the rabbit’s back.
  • Hold the bottom of the model in one hand and gently bring the points of the ears up with the other.
  • Stop when the back of the ears are roughly perpendicular to the base. Crease well.
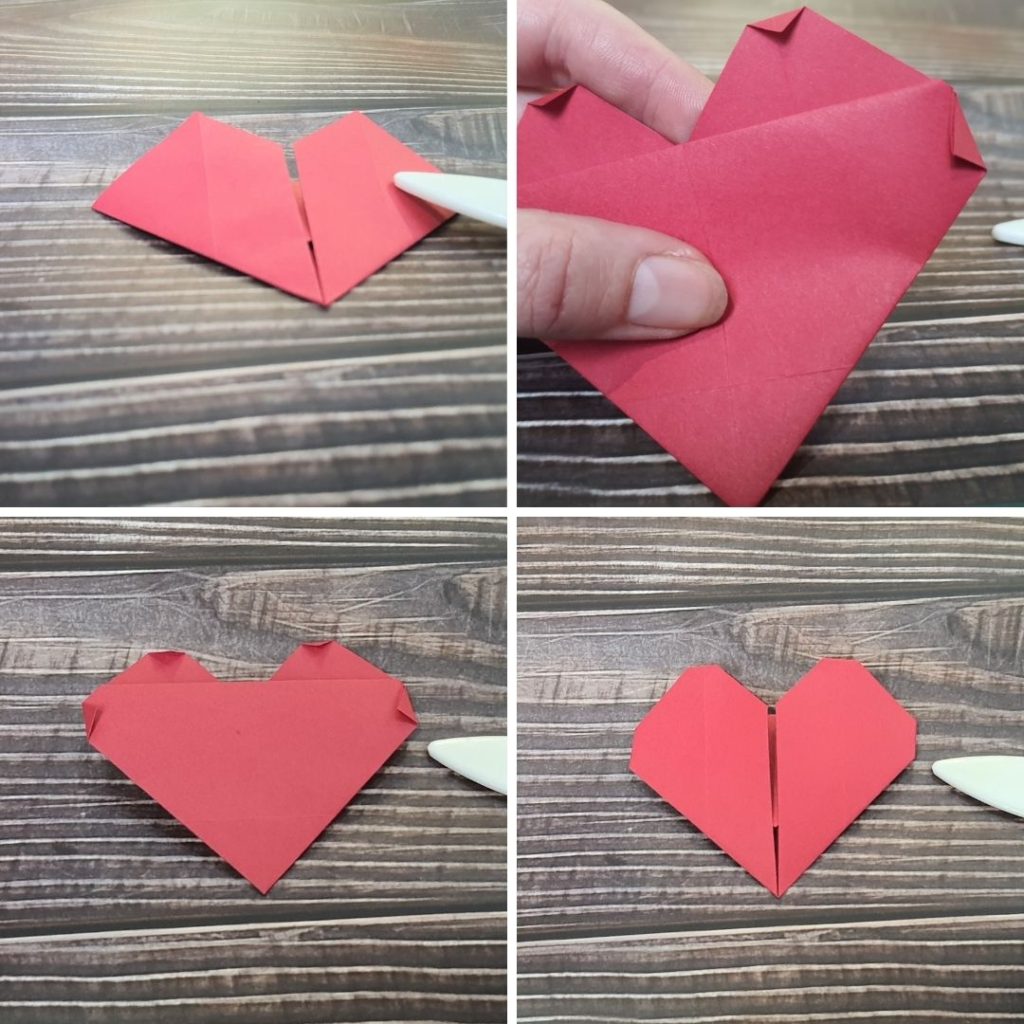
  • Ok – so the next step involves separating the ears! Take a pair of scissors and very carefully snip down the centre crease between the ears, being careful not to cut all the way down.
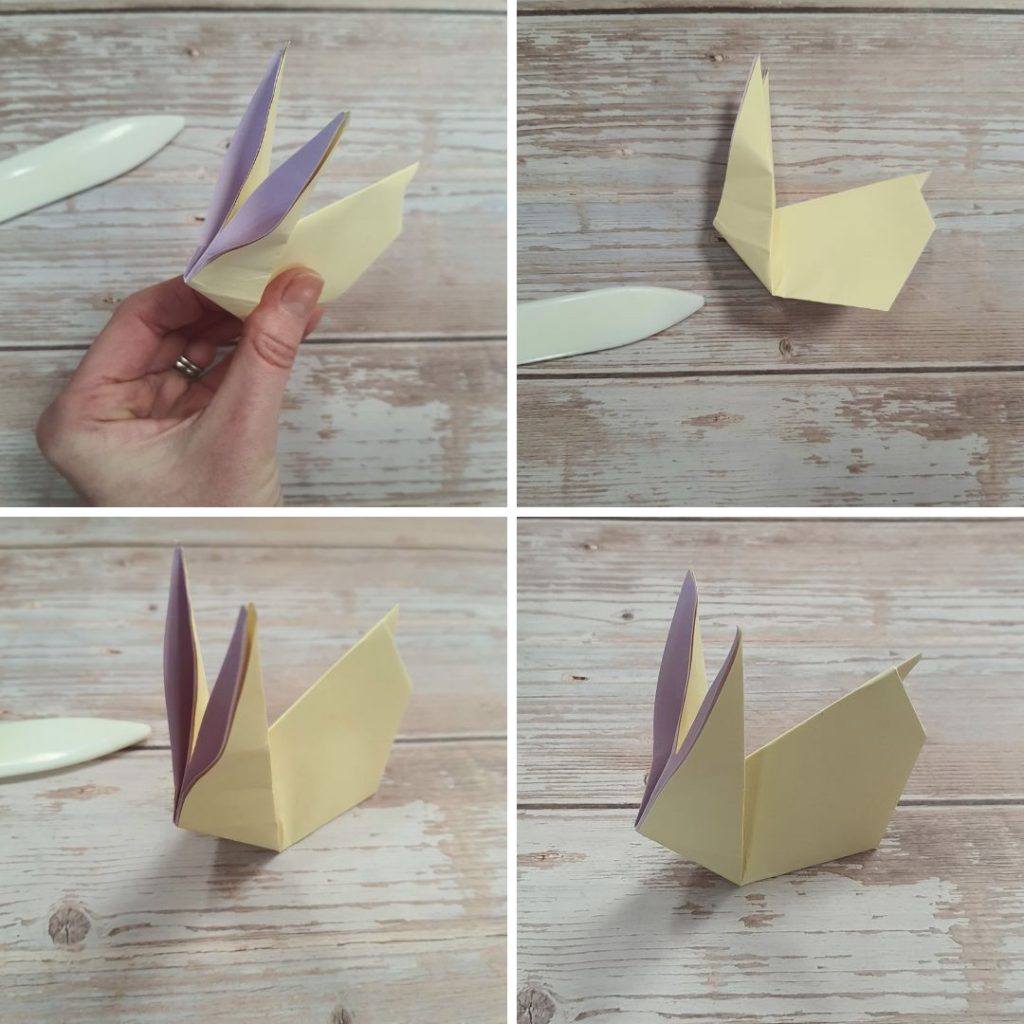
  • To give the ears a bit more shape – stick your finger in them 😂 You can open them out a bit at the bottom, which will show the contrasting paper (if you’ve used it).
  • Lastly, lay the model down and go over all the creases on the body one last time.
  • Bunny is finished! Stand bunny up.
  • 🐇
Categories
Craft Origami Paper Tutorial

Simple step-by-step origami boat tutorial

This simple origami boat is a fun model to fold. Use a fairly thin square of paper, and remember to fold neatly and crease firmly after each step.

  • Start with your paper square as shown above. If you don’t have a creasing tool, you can use the back of your thumb nail to help crease. We’ll be folding it horizontally then vertically to start with, creating a grid of quarters. Ready?
  • Fold in half from side to side, making sure the edges line up; crease and unfold.
  • Do the same thing, this time folding the other way, to create the horizontal fold; crease and open up fully.
  • You should be left with folds dissecting the paper into neat quarters.
  • Turning the paper 90 degrees, fold the bottom point under and up to meet the top point.
  • The next picture shows how the creases sit.
  • Take the bottom point and fold it up to meet the centre.
  • Do the same with the top point, so they meet in the middle.
  • Next, fold the left point into the centre…
  • …then fold this point back, but instead of folding from the original crease, fold a little way in from that.
  • The next step can be a bit fiddly, but the previous folds will help you out! Pick the model up and press gently in the centre; the middle should go down and the outside edges should come up!
  • Gently press the bottom together to encourage the creases – you’re after a big triangle at the bottom and 2 smaller triangles at the top.
  • Once your model looks right, press and crease all the folds well.
  • Lastly, fold the bottom point back to form the bottom of your boat. If you get it just right, it should stand up by itself!

Hope you enjoyed this model. They look great in different sizes to make a whole fleet.

Don’t forget, you can subscribe to my email list for updates, fun stationery finds, handmade joy and the odd treat!

Categories
Craft Origami Paper Tutorial

Tutorial: Simple origami bat

This simple origami bat is fun and quick to make and makes great decorations for Halloween. All you need is a square of thin-ish paper.

Remember, with origami you need to fold neatly and crease each fold firmly as you make them.

  • Start with the square of paper in a ‘diamond’.
  • Fold in half horizontally, bottom corner to top corner.
  • Fold in half vertically, bringing the left point over to the right point.
  • Open up the last step.
  • Fold the bottom edge up, but not all the way – just so there’s just a small triangle of the underneath layer showing.
  • Fold this little triangle down, over the edge you folded up in the last step.
  • Pick the model up and fold in half, backwards along the central crease, wing tip to wing tip.
  • Now you just need to fold the wings up! Fold the top wing only, by taking the outside point towards you and up, so the bottom edge is now in line with the central crease from the previous step.
  • Turn the model over and repeat the last step with the other wing…
  • …open out the wings slightly and you’ve got yourself a bat!

You can experiment with adding more folds in the wings to make different bats. Made this model? Share it on social media and tag me in your pics.

Categories
Craft Origami Paper Tutorial

Origami heart tutorial

This origami heart is simple to fold, so it’s a good model for beginners. Use them to decorate handmade cards or gift tags.

As with all origami tutorials, my two main rules are fold neatly and crease firmly.

  • Lay your square of paper so it’s like a diamond.
  • Fold in half, point to point, crease and unfold.
  • Do the same again, folding in half the other way.
  • You’ll be left with vertical and horizontal lines running from corner to opposite corner.
  • Fold the top corner down to meet the central crease where the lines cross.
  • Take the bottom corner and fold up so it meets the flat top edge (made in the last step).
  • One side at a time, fold the outer corners up, so the bottom edge meets the central crease (the corner point will now be at the top).
  • You should now have a rough heart shape.
  • Turn the model over and fold in the 4 top points very slightly, to create a more rounded heart shape.
  • Crease these well so they stay in place and turn the model back over.
  • You’re done!