Categories
General Origami Paper Tutorial

Step by step origami star tutorial with pictures

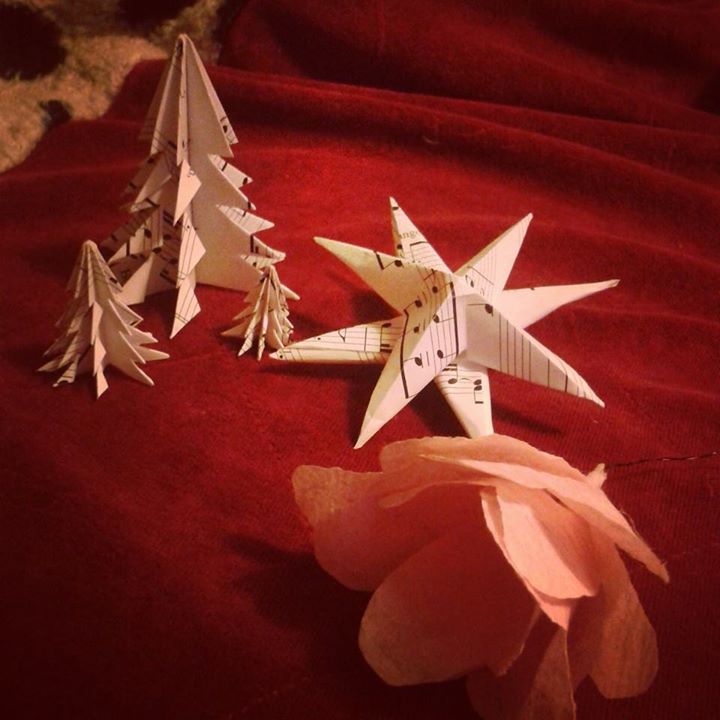
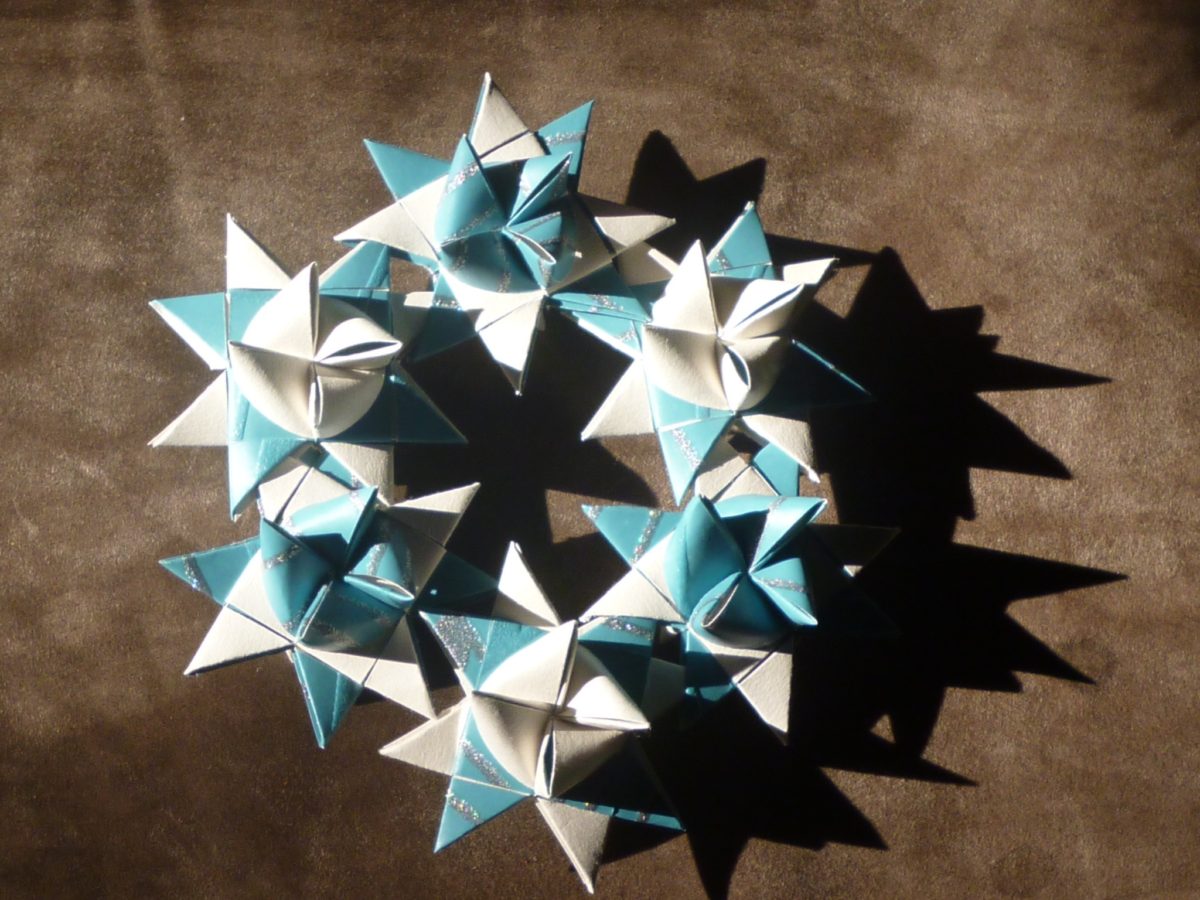
Have a go at making this origami star! It may seem fiddly, so have a practice run first on a scrap square of paper to get the hang of it.

It’s a four-pointed star, so a lot of the folds you’ll be repeating the same thing 4 times on all 4 sections/layers (often 2 front, 2 back) – bear this in mind when following along.

You’ll need a square of fairly thin paper (if your paper is double-sided, start with the plain side facing up). Don’t forget to fold neatly and crease firmly!

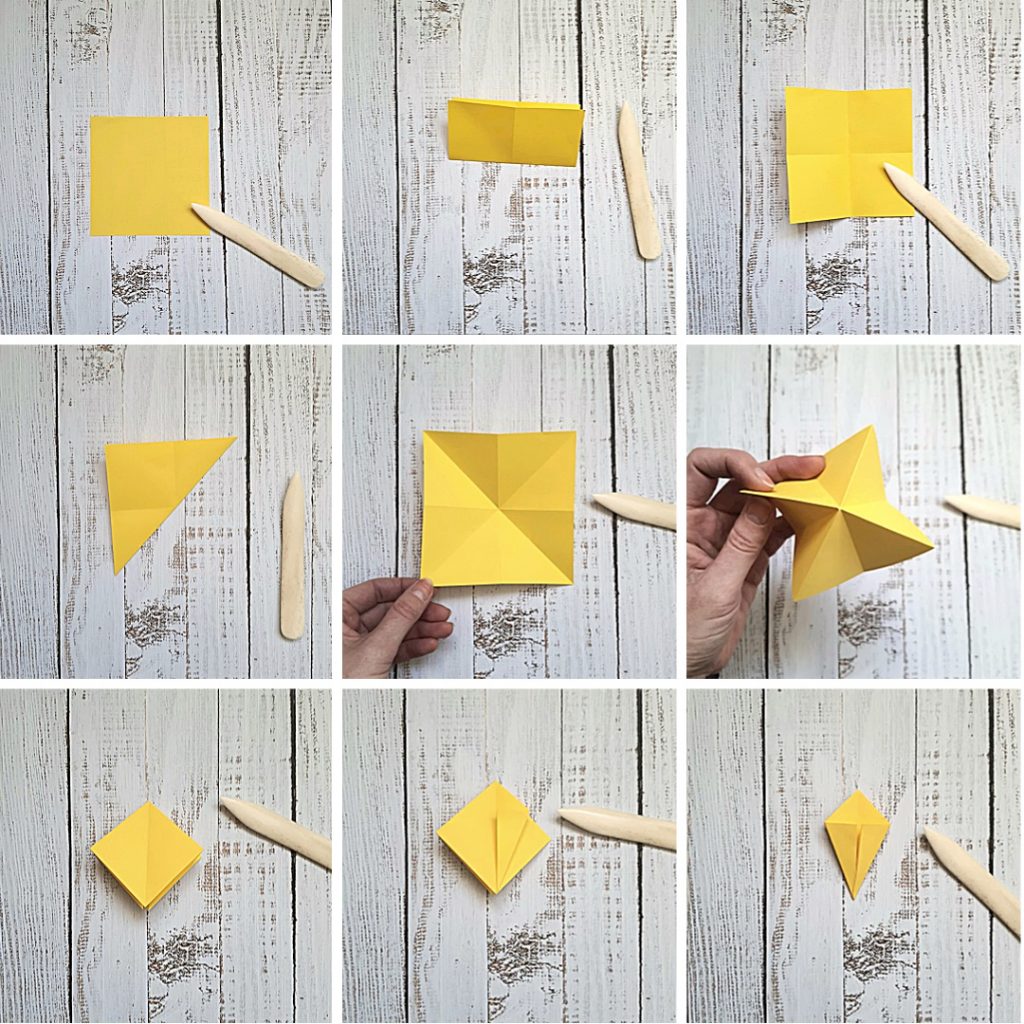
  • Start with the paper square on in front of you.
  • Fold in half from top to bottom, crease and unfold, then fold in half from side to side, creasing well.
  • Open back out into a square
  • Turn the paper over, then fold from corner to opposite corner; again, do this both ways.
  • Open back out into a square.
  • Pick the paper up and press the centre upwards, bringing the edges down.
  • You should end up with a folded diamond shape, with open layers at the bottom.
  • Taking the top layer only, fold the outside bottom edge to the centre crease.
  • Repeat this step on all bottom edges, front and back.
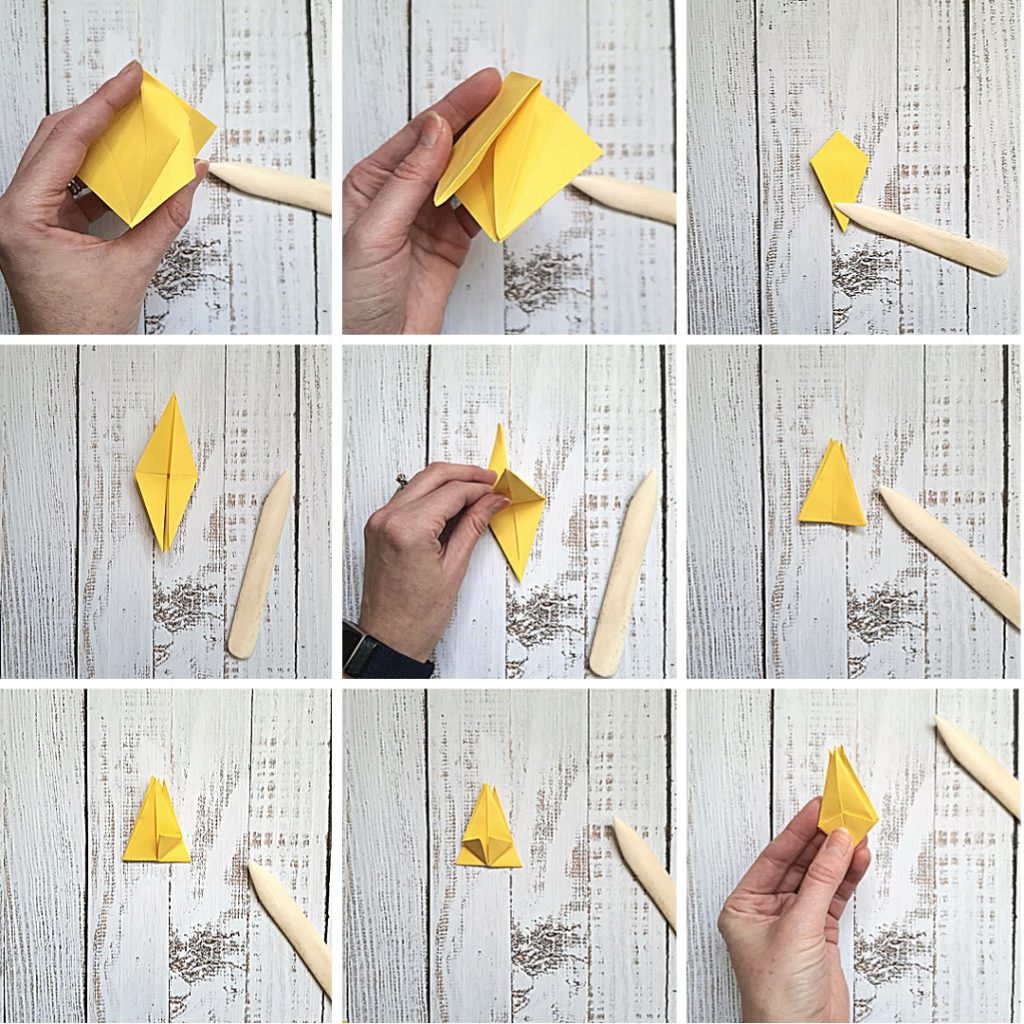
  • Next, you’ll need to open up the folds you’ve just made and, using the creases from these folds, push them inside…
  • They should look like this!
  • Repeat with all 4 folds. You should have a lot of layers at the bottom now!
  • Using the top layer only (the long triangle at the bottom), fold the bottom point upwards.
  • Repeat for all 4 points in turn.
  • At this point, the model should end look like a triangle pointing upwards.
  • Take one of the bottom outside corners and fold it in to meet the centre crease.
  • Again, this step will need to be repeated with all 4 bottom corners in turn, so fold the front 2 up…
  • …then turn over and fold the back 2 up in the same way.
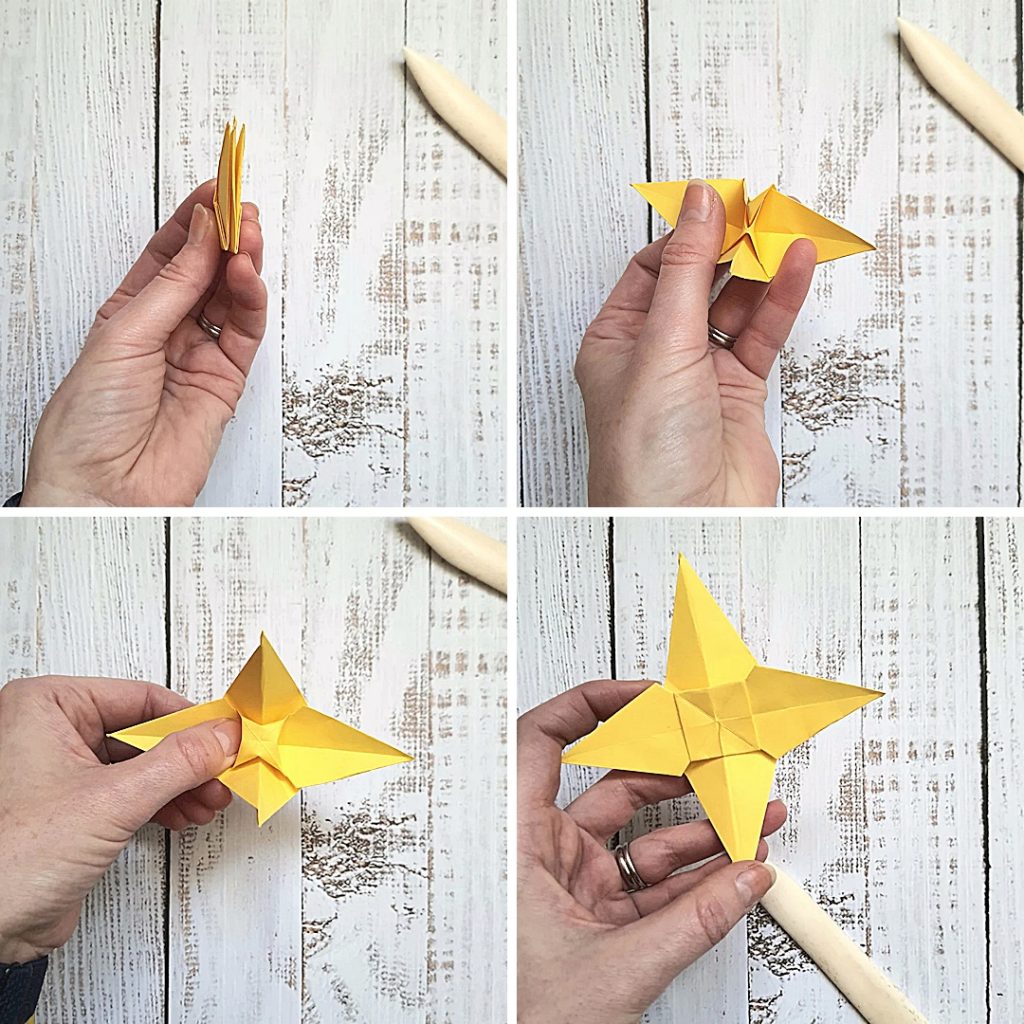
  • Pick the model up for the next step.
  • We’re going to open up the star, taking all 4 of the top points out and down.
  • It helps if you stick a thumb either side of the central point, to help you ease it open – the middle of the model should kind of lift and flatten into a square.
  • Press all the creases flat and you’re done!
  • Ta da!
Categories
Gifts Inspiration

The Craft Fantastic Handmade Christmas Gift Guide

Makers are a bit like elves, really. Hard at work creating handmade products perfect for gifting. So many people these days are starting to look past the big companies, trying instead to purchase from small businesses, creatives, and support their local economy. Which is AWESOME! And if you’ve stumbled across this blog post for that very reason, thank you.

If you don’t already know, I essentially make products from paper and rescued leather*; journals, notebooks, bookmarks, origami animals to name a few items. My products are perfect for avid readers and lovers of all things cute. I sell online, mainly on Etsy but also Folksy too. Plus, if you’re based in the Northamptonshire area, you can head over to The Emporium at Nene Court in Wellingborough to browse my handcrafted products (as well as a whole host of amazing locally made awesomeness). So, what have I got to offer all you lovely people this year? Let’s take a look!

Gifts for book lovers & readers

These soft leather bookmarks have been hand stamped with slogans – READERS GONNA READ and ONE MORE CHAPTER. They’re £6.50 each and you can find them in my Etsy store and The Emporium.

One way I use up the off-cuts of paper and leather from my big journals is to make these mini books, which I then turn into necklaces. I have a few different styles available, which you can look at online from Etsy or Folksy, plus I have a selection over at The Emporium.

Presents for notebook & journal addicts

Soft, leather-wrap notebooks & journals with blank insides, ready for you thoughts, drawing, lists and more! While they are often quite similar, because they’re made from rescued leather, each one is unique.

Kawaii origami necklaces

Currently only available online are these super cute origami animal necklaces. Folded from small squares of origami paper and then set in resin; choose from a crane, fox or butterfly.

Hope you like what you see! Please don’t hesitate to get in touch if you have a question about any of these items.

Happy browsing!

– The Captain

*When I use the term ‘rescued leather’, I mean leather in different forms which is being discarded for one reason or another. I use leather from bags and coats, off-cuts and samples, and waste from the shoe industry.

Categories
Craft Craft fairs Gifts Notebooks Origami Paper Weddings

christmas Christmas CHRISTMAS! The run-down to the run-up.

Well, that’s it for another year in terms of fairs. I’ve now attended the last of the craft and wedding events for 2017. However, I’ve already got things in the pipeline for 2018, including alternative wedding fairs and papercraft workshops – watch this blog for details! You can also follow me on Facebook for up to date info on future events.

Right now I’m winding things down a bit. My Etsy shop is fully stocked with a wide array of notebooks & journals, book necklaces, and handmade Christmas decorations so it’s time to wind down a bit, look back over the past year and sort things out in readiness for the year ahead.

I count 2017 as my first full year of business aboard The Craft Fantastic. While I set up properly at the start of 2016, that year was spent getting things off the ground. I’ve been really pleased with how the year has gone, taking bookings for an awesome range of weddings, producing custom orders, developing new product ideas and taking part in local craft and wedding fairs. Phew! I’m so grateful to everyone who’s supported me this year and for every single purchase, no matter how small.

During the run up to Christmas I am of course still taking orders via Etsy but you can also contact me here for queries on wedding flowers and custom orders. My last UK posting date is December 18th; if you order after this date, your order will still be processed, but it might not make it before Christmas.

To finish off, here are a few of my favourite makes from 2017!

Categories
Craft Craft fairs General Gifts

Pre-Christmas Roundup

the-craft-fantastic-is-having-a-pre-christmas-sale


Ahoy there! December 3rd is small business Saturday and I’m running a little pre-Christmas promo: 10% off at thecraftfantastic.etsy.com. Find festive home decor, gift wrap, stocking fillers and more!

I’ve been busy with fairs for the past couple of weekends, but now I’m done for the year. My best fair was a small Christmas coffee morning in Great Brington; a lovely collection of quality makers and lots of customers!

Currently, I’m working on keeping my Etsy shop stocked in the run up to Christmas. My newest makes are up there, these beautiful cherry blossom A6 notebooks:

cherry-blossom-notebook-a6-two

As well as these, I’m trying out some of my slogan notebooks. I’ve sold my prototype ‘GOOD IDEAS’ notebook, but plan to make more of the same, plus some personalised versions:

p1050383

Etsy store aside, I’ve started planning for 2017! I’ll have a full plan in the New Year; look out for my post with dates of fairs, promotions and events.

cf-mini-logo

Categories
Craft Craft fairs Notebooks Origami Paper

Festive Craft Stall: Northants Christmas Sparkle Fair

Sunday’s Christmas fair at the Benham Sports Arena was really fun and festive! Lots of different stalls and music throughout the day.

Here are a few pictures of the stall and my handmade goodies. The first one was taken early on… I’d only just got my coffee!

Stall

Key books        Tree decs       Mini books

Tags & masks

Categories
Craft Notebooks Origami Paper

Handmade Christmas stock – mini book necklaces & gift tags

With just less than a month to go until Christmas, things are getting busy in The Craft Fantastic workshop! Ok, it’s just me in my living room. Still, I have been quite busy planning and making things for the festive season. Over in my Folksy shop you’ll find some lovely handmade gifts and original tags to help you wrap them. Check out these miniature notebook necklaces – the perfect stocking filler for book lovers:

Mini book necklaces


There’s also a few sets of my origami gift tags, all hand folded from lovely paper:

Candy cane origami tags

Origami tree gift tag

I’m also free to take commissions on any of my origami gift tag designs, past and present, including all these designs from last year:

Christmas origami tags

Plus the silver printed snowflake designs:

Snowflake print gift tags


They’re all 4 for £2 and you can mix and match as you’d like – postage will be £1 for one or two sets, £1.50 for anything more than that.

Categories
Craft Origami Paper

Christmas paper crafts!

Football on TV last night (yawn) so I spent some time trying out different paper and origami crafts for the festive season! Some folded paper stars and Christmas trees, done from sheet music – both very simple, I’ll post tutorials soon. Also started on a lovely delicate paper flower but have run out of paper!

Christmas origami trees and star

Categories
Craft Origami

Festive paper mobiles- stars and wreaths

This weekend I have mostly been making lots of these little guys:
Froebel star
In order to make these:
Star wreath
Pretty, huh? These German paper stars, called Froebel stars, are made using four strips of paper. They look as if they might be quite complicated but once you get the basic steps down they’re easy. I found the perfect tutorial here – very clear step by step instructions.

With a Christmas craft fair coming up in November (details soon) I’ve been deciding what things I’ll be making for it- focusing on mobiles and hanging decorations this week. As well as the paper star wreaths above, I have these origami hanging decorations:
Origami hanging decks
Star mobile
Plus lots of little origami lucky stars, which I love!
Lucky stars

Categories
Craft Origami

Need a little gift box? Make one!

Having had a look in a few shops for little gift boxes to put my handmade chocolates in, I found myself disenchanted with the ones on offer. So of course I decided to make my own!

There are quite a few simple boxes that can be made out of paper/thin card; I opted for this box of triangles. I chose one without a lid, so the chocolates can be on display, looking fancy.

This one really is very simple and also very effective- just a bit different from your average cuboid!

You’ll need three squares of paper/thin card, all the same size. I know this is obvious, but do think about the size of box you need! I used 3″x3″ squares. It turned out too small; I forgot I had 8 chocolates to fit in. 6″x6″ was perfect.

Firstly, fold your first piece of paper in half from corner to corner, creasing firmly with a bone folder/thumb nail/scissor handles/similar.

Next up, fold the two corners in to the centre point. Crease firmly and unfold.

Lastly, fold up the middle point, crease firmly, unfold. You should be left with a triangle with three fold marks, like this:

Repeat with the other two squares, so you have three the same. Then slot them all together…

…and then join them up. At this stage, it should become obvious how it all fits together and the bottom forms.

Ta da!

The perfect way to present my chocolates.

Merry Christmas!

Categories
Craft

The art of gift wrapping

A nicely wrapped present is a happy present. I like to make a thing of present wrapping, get everything ready, stick a festive film on and do it all in one go.

Here are my hints and tips.

Firstly, get everything you’ll need all in one place and within reach. Then you don’t have to keep getting up to fetch things. On my list are scissors, tape (with lots of pre-cut bits stuck around), ribbon, tags, old cards to make tags from, and of course wrapping paper.

Next, a very important point- make sure you’ve taken any price labels off!

Now to wrapping. Try not to use gift tags that are a similar pattern or colour to your paper; they’ll just get lost. You can cut pictures or shapes out of old cards to make fancy tags- just be careful when sticking them on. For instance, in the picture below, you can’t lift the star tag up to read the label. Error. The bauble is fine.


When it comes to ribbon, I like to keep it simple but (hopefully) effective. Start with the ribbon on the side where you want the bow to be, twist it round at the back, then bring it round across the other way to tie:


One last tip: be wary of fancy brown paper wrap. I got this from Paperchase last year (I love you for everything but this, Paperchase!) and it is mighty pretty but tape just does not stick to it. In the end I have to plaster it on then disguise with a huge bow. Which I actually really love.

Happy present wrapping!