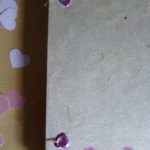
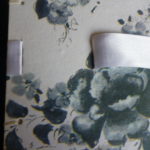
Lately I’ve been working on my wedding stock and I’m pleased to announce that I’ve got the first handmade guest books up for sale on etsy!
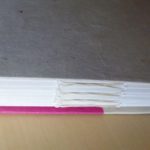
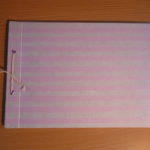
These have both been covered in beautiful paper, with lovely open-view hand stitching and ribbon fastenings.
These ones are A5 and are £18 each – P&P is £2.50. You can order these ones from my etsy shop, or contact me directly for custom orders if you would like a particular colour/style.
There are many, many tutorials out there, covering all your beginner bookbinding needs; and so I thought I’d do a hints & tips section to complement them! These are things I’ve learned and picked up along the way.
Invest in a bone folder. This will be your new best friend.
You can use grease-proof paper for waxed paper. It’s very handy for pasting onto.
PVA is great while you’re learning. Proper book paste can be quite pricey, and when you’re just starting out PVA is absolutely fine for practice work.
Get a basic set of different size brushes. You can pick them up fairly cheap from places like The Works, and it’ll help you get a feel for what you need and what you feel comfortable with.
Always have a couple of pieces of clean kitchen roll to hand! It’s sturdier than tissue and less likely to shed little bits everywhere. It’s good for wiping down surfaces and hands and things. Keep a sheet separate for using on your books to avoid smearing.
It’s best to use waxed thread. If you can get a block of beeswax from somewhere, you can wax your own thread. This works out a bit cheaper and gives you more options.
Get into the habit of fraying the loose end of the thread after a knot. This will keep it from coming undone- I use my needle for this and just tease it gently.
As with everything, the internet is a wealth of information when it comes to bookbinding tutorials. Here are a few good ones:
Spring is one of my favourite times of year. There’s so much newness going on it’s hard not to get inspired! From colour palettes to tutorials, I’ve started scouring the web to find the best ideas of the season. Here are a few of my favourites:
Painted twigs
So pretty – and such a simple idea!
Edible flower lollies
Adding edible flowers (e.g. rose petals, lavender) to your homemade lolly molds looks gorgeous. Hopefully it will be warm enough for ice lollies this spring…
Pom pom bunny
Because pom poms. And because bunnies. Tutorial found here.
Spring weekly planner
Oh planning, I love planning. This pink spring set is available from WendyPrints over on etsy. Time to get those to do lists looking fabulous!
Plant shelves
This idea of using an old ladder as shelves for your potted plants looks stunning. A great way of adding some spring colour to even the smallest garden.
You can follow my spring Pinterest board here for more ideas.
I’m pleased to announce that The Craft Fantastic has a stall at the Castle Ashby fair the the end of May! This craft fair falls on the Bank Holiday – Sunday 29th and Monday 30th May. Also, THERE WILL BE FALCONS. Falcons!
Run by Palladian Events, the fair will be set in the beautiful Castle Ashby walled gardens, and over the 2 days there will be a fantastic range of quality crafters from all over the country, plus food, music, demonstrations, a falconry display… what more could you want?
I’ll have a full range of handmade notebooks, journals, sketchbooks, miniature notebook necklaces, as well as origami flowers for all occasions.
It will cost just £5.50 for adults (£5 concession, under 10’s go free) to gain access to the show and gardens. Cross your fingers now for good weather!
Up till now, I’ve been making simple notebooks or amending existing templates to create my own notebooks. But now I’m working for myself, I’m starting to have time to create my own designs and templates. This is the first!
Friends and family have kindly donated old leather bags for me to up-cycle; as soon as I saw this yellow leather, I knew it would work beautifully with the map print paper I bought in Amalfi a few years ago. I’d been hoarding the paper for the right project and this was definitely it.
Taking what I’ve learned over the years I’ve been making notebooks, I combined a flexible leather spine with solid boards front and back, covered in that beautiful quality map paper, finishing off the corners with leather for durability (and because it looks gorgeous!).
Hope you like it as much as I do! I’ll be making more of these and also designing new books, so keep a look out 🙂
With Valentine’s Day fast approaching, there’s not much time left to order your gifts! There’s a range of handmade goodies over at my Valentine’s page. As Valentine’s Day is on a Sunday this year, I suggest ordering by Monday Feb 8th to guarantee getting your items on time.
I’m currently working to stock my online shops with my handmade notebooks, plus I’ve got some products into a shop in town – so it’s all go! Here are some samples of what I’ve been doing:
Over the Festive season, tucked in between Christmas and New Year, I ran my very first workshop. It was just a small group at a friend’s house and I knew everyone there, so I figured it would be a good way to test things out. Check out my team of paper folders 🙂 :
Happy workers!
The main project I wanted to try out was the origami kusudama flower: a modular item made up of five petal units. These are the same flowers I used to make the wedding flowers I did recently. The folds are fairly straightforward, but not so simple that there’s no challenge, and the end result is very satisfying!
Step 1: I made sure I brought along everything we’d need. This is one step I got right first time – squares of practice paper, squares of pretty paper, glue, glue pot and enough sticks/brushes for everyone, paperclips, sparkly beads on wire, pearls, sticky gems… ok so I forgot a table cloth and had to borrow an old sheet, but I still think I did a pretty good job.
Flowers in the making
It being my first time, I had trouble trying to gauge who needed help, who wanted help, and who wanted to be left alone to figure it out for themselves. Everyone is different and works differently but we all got there in the end- apart from my husband, who gave up after one petal, but I’m ignoring that.
Someone’s done this before…
Overall the workshop took about an hour, which I think is a good amount of time. We were all there for the evening though, so carried on and did some teeny cranes and butterflies!
Ta da!
The experience was really good fun and I would love to do some proper workshops in the future. There are definitely things to improve on though, and I’ve come up with some useful hints and tips for anyone thinking of running their own workshop:
Make sure you have EVERYTHING with you. I know you say you think you have. But maybe just double check?
Have an example of whatever you’re making to show people – on a large scale if possible.
Explain the fundamentals of the craft you’re about to demonstrate; the basic techniques, maybe a bit of history, uses in today’s society.
Write out step-by-step instructions FOR YOURSELF. Really, do it. I’ve made well over 500 flower petals but when it came to showing other people, I had a block on the basic steps. I just couldn’t think if I was doing it right. So write yourself a how to!
Before doing the workshop, talk through the steps you’ll be showing to someone you know well. Someone who will butt in and tell you if what you’re saying doesn’t make sense. Somethings are easy to do but not explain. “Just fold this bit here… no this bit… yeah… fold it to that other bit over there…”
Talk clearly, explain fully, demonstrate as neatly as possible and keep looking round at everyone to make sure they’re all up to speed. As I mentioned before, it is hard to gauge how much help people want and need, but I think this will come with time.
Time your workshop!
I think that just about covers everything 🙂 Till next time x